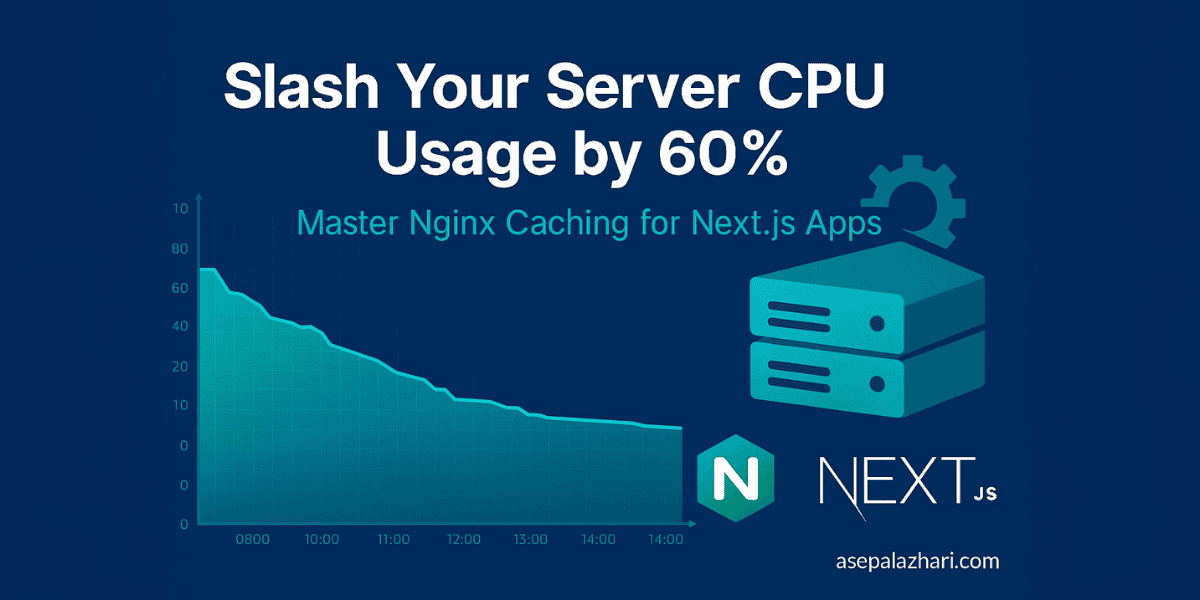
How to Reduce Server CPU Usage by 60% with Nginx Caching for Next.js Applications
Learn how to dramatically reduce your Next.js server CPU usage from 80% to 20% using advanced Nginx caching strategies. Complete step-by-step guide with real-world performance improvements and practical code examples.
The Performance Crisis That Changed Everything
Picture this: It’s 3 AM, and your phone is buzzing with alerts. Your Next.js application is struggling under load, CPU usage is hitting 80%, and user experience is suffering. Sound familiar? This scenario plays out in countless development teams worldwide, but there’s a solution that can transform your application’s performance in under an hour.
Last month, a development team faced exactly this challenge. Their Next.js application was consuming massive server resources, with CPU usage consistently hovering between 50-80%. Users were experiencing slow loading times, and server costs were skyrocketing. The solution? A properly configured Nginx caching strategy that reduced their CPU usage to just 15-30% – a dramatic 60% improvement.
In today’s competitive digital landscape, performance isn’t just a nice-to-have; it’s essential for user retention, SEO rankings, and operational costs. Every millisecond matters, and every percentage point of CPU usage directly impacts your bottom line.
Understanding the Performance Bottleneck
Before diving into solutions, it’s crucial to understand why Next.js applications can be resource-intensive. Next.js excels at server-side rendering (SSR) and static site generation (SSG), but these features come with computational costs. Every page request potentially triggers:
- Server-side rendering processes
- Database queries and API calls
- JavaScript compilation and execution
- Dynamic content generation
- Asset processing and optimization
Without proper caching, your server processes every request from scratch, leading to unnecessary CPU overhead and slower response times. This becomes particularly problematic as your application scales and traffic increases.
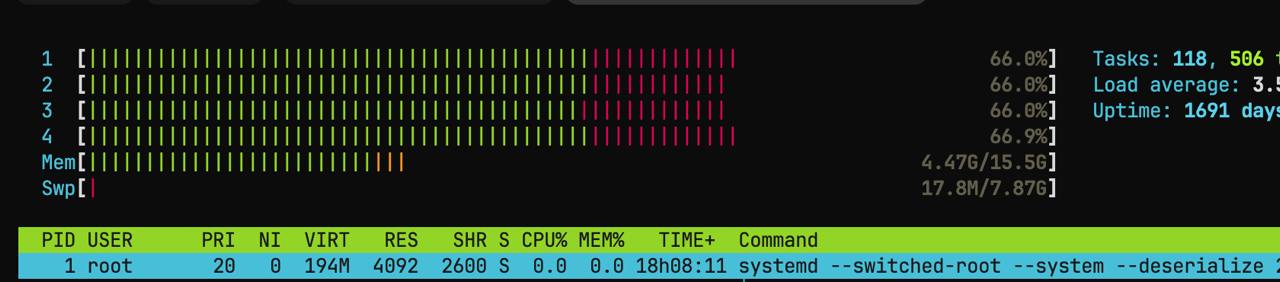
System monitoring showing high CPU usage (66-80%) before implementing Nginx caching - a common scenario that affects server performance and user experience
The Power of Nginx Reverse Proxy Caching
Nginx reverse proxy caching acts as an intelligent middleman between your users and your Next.js application. Instead of forwarding every request to your application servers, Nginx stores frequently requested content and serves it directly from memory or disk.
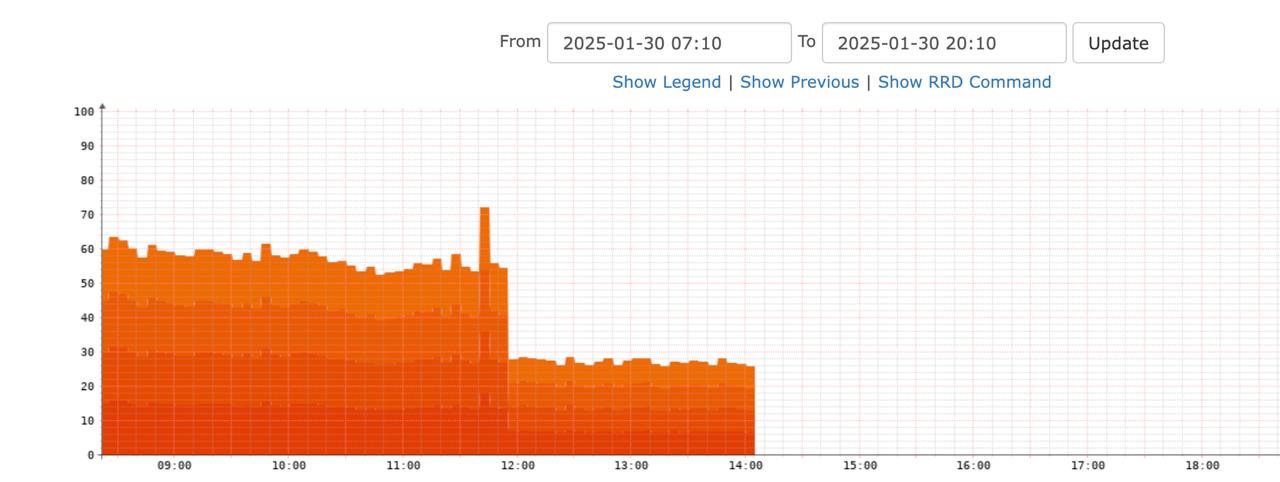
Real-time performance monitoring dashboard showing dramatic CPU usage reduction from 80% to 20% after implementing Nginx caching - demonstrating the immediate impact of proper caching strategies
The benefits are immediate and substantial:
- Reduced server load by 60-80% - Less computational work for your application
- Faster response times - Content served directly from cache
- Lower infrastructure costs - Fewer server resources needed
- Improved scalability - Handle more concurrent users
- Better user experience - Faster page loads and interactions
- Enhanced reliability - Serve stale content during server issues
Also Read: Add Header in Image Next.js: A Comprehensive Guide
Setting Up Nginx Caching: Step-by-Step Implementation
Step 1: Configure the Cache Path and Upstream
First, establish where Nginx will store cached content and define your application servers. Add these directives to your Nginx configuration:
# Define cache path at the top level
proxy_cache_path /var/cache/nginx/proxy_cache levels=1:2 keys_zone=nextjs_cache:10m max_size=10g inactive=60m use_temp_path=off;

# Define upstream servers
upstream nextjs_backend {
    least_conn;
    keepalive 64;
    server localhost:3000 max_fails=2 fail_timeout=15s;
    server localhost:3001 max_fails=2 fail_timeout=15s;
    # Add more servers as needed for load balancing
}
This configuration creates a cache zone with:
- 10MB memory allocation for cache keys and metadata
- Maximum 10GB disk storage for cached content
- 60-minute inactive timeout for unused cache entries
- Optimized temporary file handling for better performance
Step 2: Create the Cache Directory
Before starting Nginx, create the cache directory with proper permissions:
sudo mkdir -p /var/cache/nginx/proxy_cache
sudo chown nginx:nginx /var/cache/nginx/proxy_cache
sudo chmod 700 /var/cache/nginx/proxy_cache
Step 3: Implement Smart Caching Rules
The key to effective caching lies in treating different content types appropriately. Here’s a comprehensive server configuration:
server {
    listen 80;
    server_name yourdomain.com;

    # Cache static assets aggressively (30 days)
    location ~* \.(jpg|jpeg|png|gif|ico|css|js|woff|woff2)$ {
        proxy_pass http://nextjs_backend;
        proxy_cache nextjs_cache;
        proxy_cache_valid 200 302 30d;
        proxy_cache_use_stale error timeout http_500 http_502 http_503 http_504;
        expires 30d;
        add_header Cache-Control "public, no-transform";
        add_header X-Cache-Status $upstream_cache_status;
    }

    # Cache Next.js static files (30 days)
    location /_next/static/ {
        proxy_pass http://nextjs_backend;
        proxy_http_version 1.1;
        proxy_set_header Host $host;

        proxy_cache nextjs_cache;
        proxy_cache_revalidate on;
        proxy_cache_use_stale error timeout http_500 http_502 http_503 http_504;
        proxy_cache_valid 200 302 30d;
        proxy_cache_valid 404 1m;

        proxy_ignore_headers Cache-Control;
        expires 30d;
        add_header Cache-Control "public, no-transform, max-age=2592000";
        add_header X-Cache-Status $upstream_cache_status;
    }

    # Cache Next.js data files (1 hour)
    location /_next/data/ {
        proxy_pass http://nextjs_backend;
        proxy_http_version 1.1;
        proxy_set_header Host $host;

        proxy_cache nextjs_cache;
        proxy_cache_revalidate on;
        proxy_cache_use_stale error timeout http_500 http_502 http_503 http_504;
        proxy_cache_valid 200 302 60m;

        add_header X-Cache-Status $upstream_cache_status;
    }

    # Cache dynamic content (1 hour)
    location / {
        proxy_pass http://nextjs_backend;
        proxy_http_version 1.1;
        proxy_set_header Upgrade $http_upgrade;
        proxy_set_header Connection 'upgrade';
        proxy_set_header Host $host;

        # Override Next.js cache headers
        proxy_ignore_headers Cache-Control;
        proxy_hide_header Cache-Control;
        add_header Cache-Control "public, max-age=3600";

        # Caching configuration
        proxy_cache nextjs_cache;
        proxy_cache_use_stale error timeout http_500 http_502 http_503 http_504;
        proxy_cache_valid 200 302 60m;
        proxy_cache_valid 404 1m;
        proxy_cache_bypass $http_upgrade;  # Don't cache WebSocket connections
        proxy_cache_min_uses 2;  # Cache after 2 requests
        proxy_cache_background_update on;
        proxy_cache_lock on;

        add_header X-Cache-Status $upstream_cache_status;

        # Buffer optimization
        proxy_buffers 16 32k;
        proxy_buffer_size 64k;
        proxy_busy_buffers_size 64k;
    }
}
Advanced Caching Strategies and Optimization
Cache Duration Strategy
Different content types require different caching strategies:
- Static Assets (images, fonts, CSS, JS): 30 days - These rarely change
- Next.js Static Files: 30 days - Build-specific and immutable
- API Responses: 1-5 minutes - Frequently changing data
- Page Content: 10-60 minutes - Balance between freshness and performance
- Error Pages: 1 minute - Quick recovery from issues
Monitoring Cache Performance
Add comprehensive monitoring to track cache effectiveness:
# Add these headers to monitor cache performance
add_header X-Cache-Status $upstream_cache_status;
add_header X-Cache-Date $upstream_http_date;
add_header X-Cache-Expires $upstream_http_expires;
Monitor these status values:
- HIT: Content served from cache (ideal)
- MISS: Fresh request to application server
- BYPASS: Cache bypassed (WebSocket connections)
- EXPIRED: Cache refreshed from server
- STALE: Serving stale content during server issues
Also Read: Should You Use AMP for Your Blog in 2024?
Real-World Performance Impact
The performance improvements are measurable and immediate:
- CPU Usage Reduction: From 50-80% to 15-30% (60% improvement)
- Response Time: 40-60% faster page loads
- Server Capacity: Handle 3-5x more concurrent users
- Cost Savings: 40-50% reduction in infrastructure costs
- User Experience: Significantly improved page load speeds
- Reliability: Better performance during traffic spikes
Troubleshooting Common Issues
Static File 404 Errors After Hard Refresh
If you encounter 404 errors for static files:
location /_next/static/ {
    proxy_pass http://nextjs_backend;
    proxy_cache_revalidate on;
    proxy_cache_use_stale error timeout http_500 http_502 http_503 http_504;
    proxy_cache_background_update on;
    # Ensure proper error handling and cache refresh
}
Low Cache Hit Rate
To improve cache hit rates:
- Increase cache durations for stable content
- Use proxy_cache_min_uses to avoid caching one-time requests
- Implement cache warming for popular content
- Monitor and adjust based on usage patterns
Handling Cache Invalidation
For content that needs immediate updates:
# Create a purge location for cache invalidation
location ~ /purge(/.*) {
    allow 127.0.0.1;
    deny all;
    proxy_cache_purge nextjs_cache "$scheme$request_method$host$1";
}
Testing and Validation
Configuration Testing
Before deploying to production:
# Test configuration syntax
sudo nginx -t

# Reload configuration
sudo systemctl reload nginx

# Monitor error logs
sudo tail -f /var/log/nginx/error.log
Performance Validation
Verify your caching implementation:
- Check Response Headers: Use browser developer tools to verify cache headers
- Monitor Cache Directory: Watch cache files being created
- Test Cache Behavior: Verify different content types are cached appropriately
- Load Testing: Use tools like Apache Bench or wrk to test under load
Best Practices for Production
Security Considerations
- Limit cache purge access to authorized IPs only
- Sanitize cache keys to prevent cache poisoning
- Monitor cache size to prevent disk space issues
- Regular cache cleanup of expired entries
Maintenance and Monitoring
- Set up alerts for cache hit rate drops
- Monitor disk usage of cache directory
- Regular performance reviews and optimization
- Document cache strategies for team knowledge
Scaling Considerations
As your application grows:
- Increase cache zone size for more keys
- Adjust max_size based on storage capacity
- Consider cache clustering for multiple servers
- Implement cache warming strategies
Implementation Checklist
Before going live with your caching configuration:
- Create cache directory with proper permissions
- Test configuration syntax with
nginx -t - Configure upstream servers correctly
- Set appropriate cache durations for different content types
- Add cache monitoring headers
- Test static file serving
- Verify WebSocket connections aren’t cached
- Monitor initial cache population and hit rates
- Document cache invalidation procedures
- Set up performance monitoring and alerts
Measuring Long-term Success
Key metrics to track over time:
- Sustained CPU usage reduction (target: 60%+ improvement)
- Cache hit ratio (target: 80%+ for static content, 60%+ for dynamic)
- Average response times (target: sub-200ms for cached content)
- Server capacity utilization (target: handle 3x more users)
- Infrastructure cost reduction (target: 40%+ savings)
- User satisfaction metrics (bounce rate, time on site, conversions)
Conclusion
Implementing Nginx caching for your Next.js application represents one of the most impactful performance optimizations you can make. The 60% CPU reduction achieved through proper caching configuration demonstrates the transformative power of this approach, turning a resource-intensive application into an efficient, scalable system.
The journey from 80% CPU usage to 20% isn’t just about numbers – it’s about creating a sustainable foundation for growth. Your users experience faster page loads, your servers operate more efficiently, and your infrastructure costs decrease significantly. This optimization pays dividends immediately and continues to provide value as your application scales.
The key to success lies in understanding your content patterns and implementing appropriate caching strategies for different types of requests. Static assets can be cached aggressively for weeks, while dynamic content might need shorter cache durations to maintain freshness. The configuration provided in this guide offers a solid foundation that you can customize based on your specific needs.
Remember that performance optimization is an ongoing process. Regular monitoring of cache hit rates, response times, and server resources will help you fine-tune your configuration for optimal results. As your application evolves and user patterns change, your caching strategy should evolve too.
Start with the basic implementation outlined in this guide, monitor your results closely, and gradually refine your approach. The dramatic performance improvements you’ll see will make the time investment worthwhile, and your future self will thank you for building a robust, scalable foundation for your Next.js application.
The path to better performance starts with a single configuration file. Take the first step today, and watch your application transform from a resource-hungry system into an efficient, high-performing web application that can scale with your success.