GitLab CI/CD Dynamic Variables: Dev, Staging & Production Config Guide [2026]
Stop duplicating configs for every environment. This guide shows how to use GitLab CI/CD dynamic variables with environment scope — automatically switching API URLs, secrets, and feature flags between dev, staging, and production with real pipeline examples.
![GitLab CI/CD Dynamic Variables: Dev, Staging & Production Config Guide [2026]](https://cdn.asepalazhari.com/images/articles/deployment/gitlab-ci-cd-dynamic-variables-across-environments.png)
Mastering CI/CD Variables: A Smart Solution for Multi-Environment Deployments
Have you ever found yourself in a tangled mess trying to configure your application for different environments? From a relaxed development setup, to a near-production staging, and finally the critical production environment, each demands unique settings. I distinctly remember the headache of juggling settings like BASE_URL or API_KEY, constantly fearing a mix-up between dev.myapp.com and prod.myapp.com. A single typo could lead to test data polluting production or, worse, the live application connecting to an empty staging database. This constant anxiety, and countless minor incidents, pushed me to seek a safer, cleaner, and more automated solution.
This is where GitLab CI/CD emerged as a true savior. Specifically, its variable management feature, with environment scope, allows us to define variables with the same name but different values, depending on which environment the pipeline is running in. This isn’t just a neat trick; it’s a fundamental practice for achieving a smooth, drama-free DevOps workflow. This article will guide you through harnessing this power, ensuring your deployments are always on target without configuration worries. Ready to banish those headaches? Let’s dive in!
Why Environment-Specific Variables Are Crucial
In modern software development, we rarely (or should never) operate with a single environment. Our applications typically pass through several stages:
- Development: Where developers experiment, try new features, and often use dummy data.
- Staging: An environment designed to be as close to production as possible for final testing before release. This is where QA performs regression tests and UAT.
- Production: The live environment accessed by end-users. Errors here can have significant consequences.
Each of these environments has distinct configuration requirements. For instance:
- API URLs:
api.dev.example.com,api.staging.example.com,api.prod.example.com - External API Keys:
DEV_API_KEY,STAGING_API_KEY,PROD_API_KEY - Database Credentials:
DB_USER_DEV,DB_USER_STAGING,DB_USER_PROD - Feature Flags: Certain features might be enabled in development for testing but disabled in production.
Traditionally, managing this could be a nightmare. You might be tempted to manually change configuration files before each deployment, but this is highly error-prone. Alternatively, using complex if-else statements within your code makes the codebase messy and difficult to maintain.
The solution? Leverage environment variables that can be centrally managed by your CI/CD platform, in this case, GitLab. By providing the ability to assign different variable values based on an “environment scope,” we can achieve a high degree of automation and eliminate human error.
Getting Started: Defining Environments in GitLab
Before we can start playing with variables, the first step is to ensure GitLab knows what “environments” we have. This is done via the Deployments > Environments menu in your GitLab project. As seen from the provided case, you’ve already defined the staging environment.
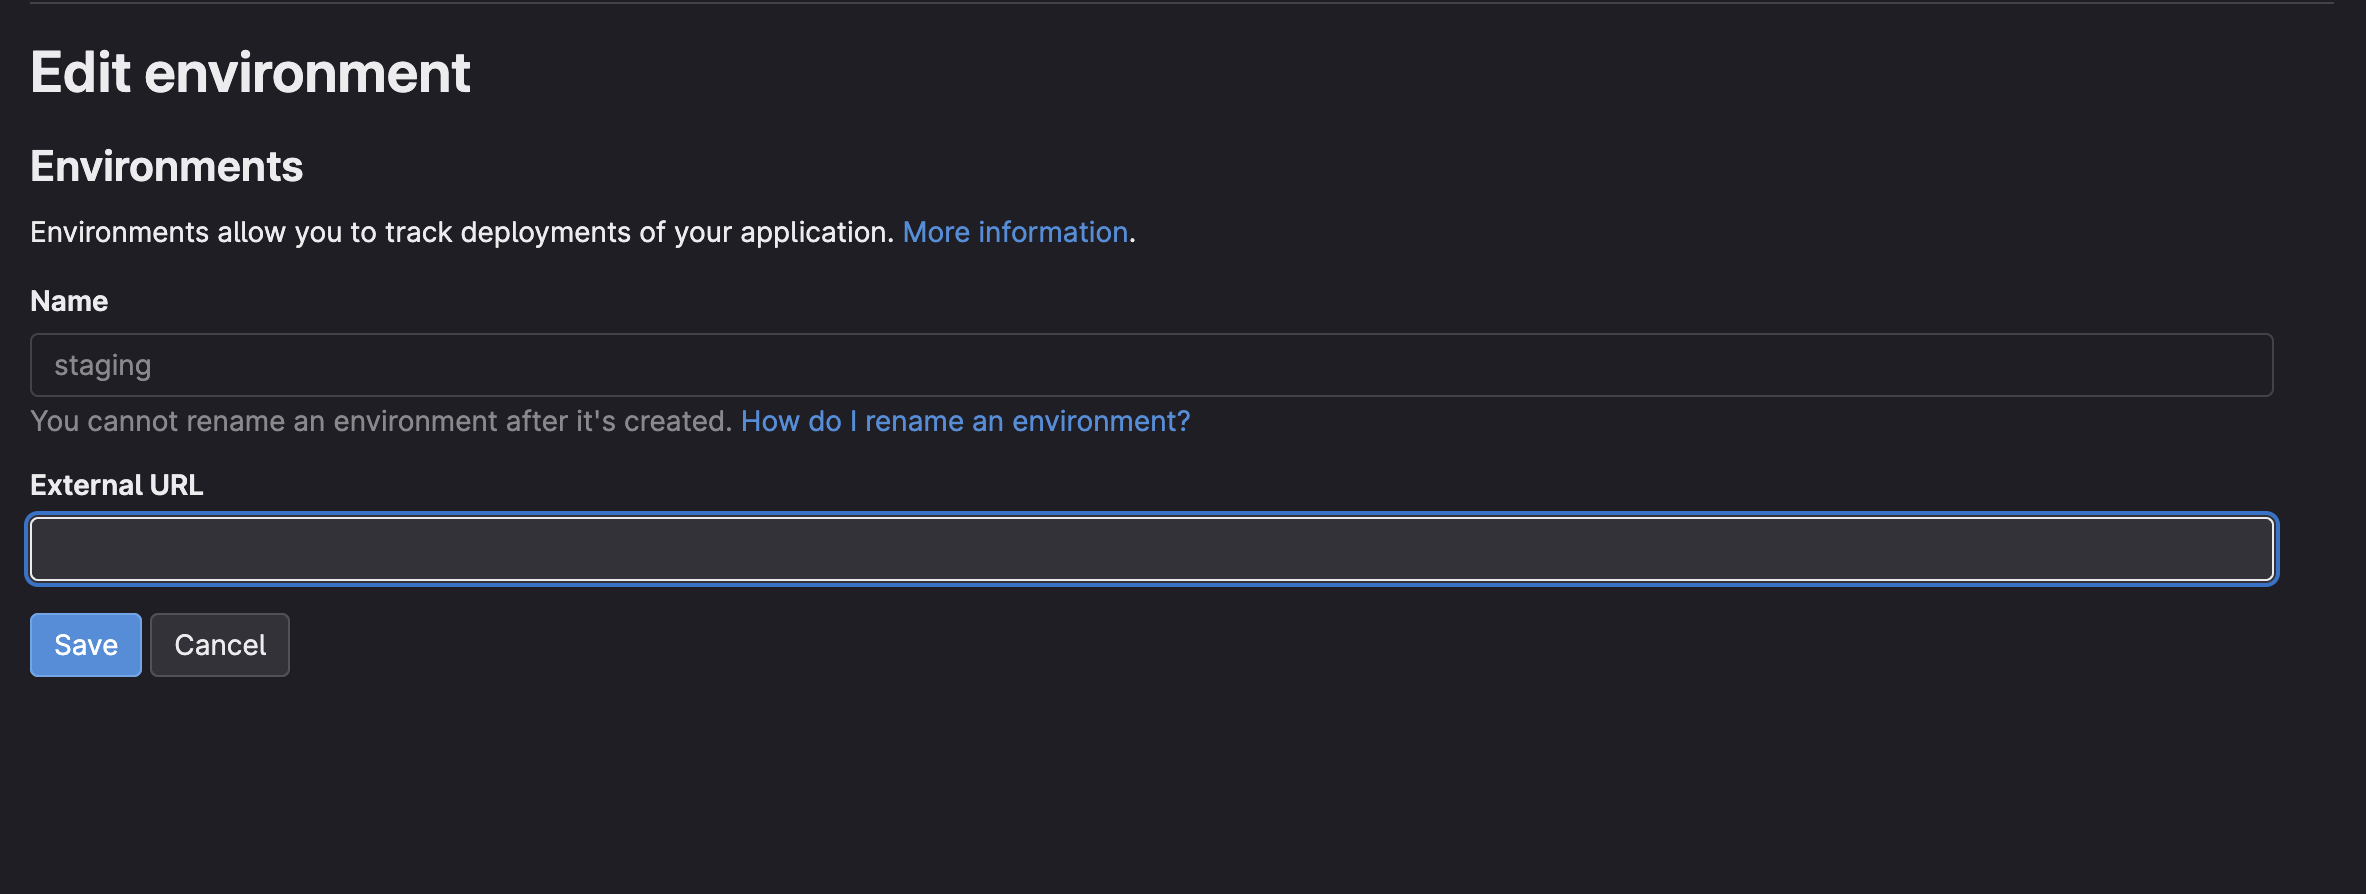 GitLab environment settings showing ‘staging’ environment with an external URL.
Defining environments here is not just a formality. It allows GitLab to:
- Track deployments to that specific environment.
- Provide quick links to the environment’s external URL.
- Most importantly, serve as the foundation for our CI/CD variable’s environment scope.
The Secret Sauce: Configuring Variables with Environment Scope
This is the core of our discussion. In GitLab, you can create variables with the same name but different values by assigning a specific environment scope. Let’s take the example case we discussed: you have * (as default/main) and staging.
Variable for the Default Environment (
*orAll (default)):- Navigate to Settings > CI/CD > Variables.
- Click Add variable.
- Enter the
Key(e.g.,APP_API_BASE_URL). - Enter the
Value(e.g.,https://api.prod.mycompany.com). - Leave the
Environment scopeasAll (default)or select*. - It’s highly recommended to check
Protect variable(if this is for production and contains sensitive data) andMask variableso the value isn’t visible in logs. - Click Add variable.
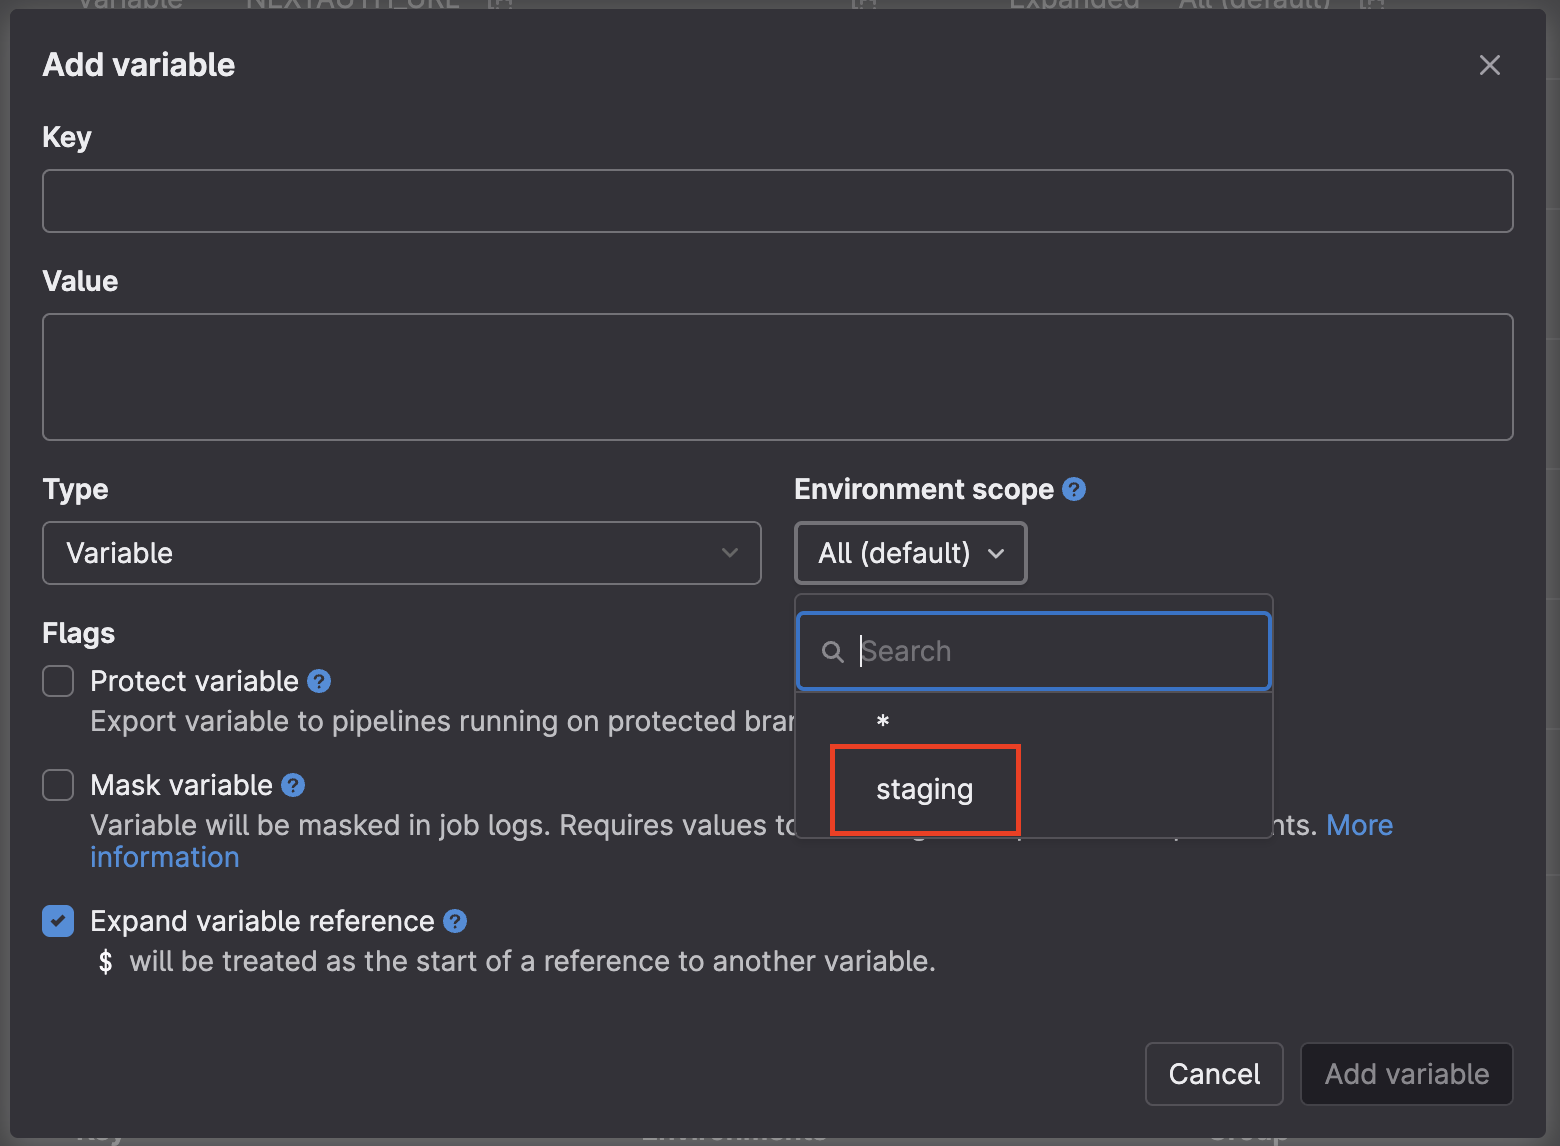 GitLab CI/CD variable creation interface, showing options for key, value, type, environment scope, and flags.
Personal Anecdote: I once forgot to check
Mask variablefor anAPI_KEYin a development environment. As a result, the key was exposed in the build logs – thankfully, only internally. That incident served as a stark reminder of how criticalMask variableis, especially for credentials.Variable for the
stagingEnvironment:- Click Add variable again.
- Enter the exact same
Keyas the previous variable (APP_API_BASE_URL). - Enter a different
Valuethat is appropriate for yourstagingenvironment (e.g.,https://api.staging.mycompany.com). - Select
Environment scopeasstaging. - Adjust
Protect variableandMask variableas needed. - Click Add variable.
Now, you have two variables named APP_API_BASE_URL, but with different values for different scopes. GitLab will intelligently choose the appropriate value.
Connecting CI/CD Jobs to Environments
For GitLab to know when to use the staging variable versus the * variable, you need to tell your jobs in .gitlab-ci.yml which environment they are deploying to. This is done by adding an environment block to the relevant job.
Let’s assume you have a main branch for production (implicitly using the * scope here) and a feature/file-manager-media-s3 branch for staging.
# .gitlab-ci.yml

stages:
  - build
  - deploy

build_app:
  stage: build
  script:
    - echo "Building application..."
    - npm ci
    - npm run build

deploy_to_staging:
  stage: deploy
  script:
    - echo "Deploying to Staging Environment..."
    - echo "Current API Base URL for Staging: $APP_API_BASE_URL" # This will automatically pick the 'staging' value
    # Your specific deployment commands to the staging server
    - rsync -avz --delete public/ user@your-staging-server:/var/www/html/staging/
  environment:
    name: staging
    url: [https://api.prod.mycompany.com](https://api.prod.mycompany.com) # The URL you defined in GitLab UI
  only: # Using 'only' to limit job execution
    - feature/file-manager-media-s3 # This job only runs for this branch

deploy_to_production:
  stage: deploy
  script:
    - echo "Deploying to Production Environment..."
    - echo "Current API Base URL for Production: $APP_API_BASE_URL" # This will automatically pick the '*' value
    # Your specific deployment commands to the production server
    - rsync -avz --delete public/ user@your-production-server:/var/www/html/production/
  environment:
    name: production # You should also create a 'production' environment in GitLab UI
    url: [https://prod.mycompany.com](https://prod.mycompany.com)
  only:
    - main # This job only runs for the main branch
How GitLab Selects Variables?
GitLab’s variable selection priority is as follows:
- Specific Environment: If a job has an
environmentblock and the environment name exactly matches a variable’s scope (name: stagingin the job will look for variables withEnvironment scope: staging), then that specific variable will be used. - Wildcard (
*): If no variable with an exact scope match is found for the job’s environment, GitLab will then look for variables with a*(All/default) scope.
This means that when the pipeline runs on the feature/file-manager-media-s3 branch and the deploy_to_staging job is executed, GitLab will see environment: name: staging. It will then look for an APP_API_BASE_URL variable with staging scope and use it.
Conversely, when the pipeline runs on the main branch and the deploy_to_production job is executed, GitLab will look for an APP_API_BASE_URL variable with production scope. If none exists (and if production doesn’t have a specific APP_API_BASE_URL variable), GitLab will fall back to the APP_API_BASE_URL variable with the * scope. This provides incredible flexibility.
only vs. rules: Choices in Job Control
In the case above, you opted to use only: - feature/file-manager-media-s3. This is a valid and commonly used method to limit job execution to a specific branch.
only: Simple and effective for basic branch-based restrictions. The job will only run if the commit originates from the listed branches.rules: GitLab recommendsrulesfor more advanced control. You can combine various conditions (if,changes,exists) and explicitly definewhen(when the job runs, e.g.,on_success,manual,always,never).
For instance, if you wanted the deploy_to_staging job to run only on feature/file-manager-media-s3 and only if there are changes in your project’s src/ folder, rules would be a better fit:
deploy_to_staging:
    stage: deploy
    # ...
    rules:
        - if: $CI_COMMIT_BRANCH == "feature/file-manager-media-s3"
          changes:
              - src/**/*
          when: on_success
However, for your current needs, only is perfectly sufficient and will work flawlessly.
Conclusion: Automation that Frees Developers
Managing environment variables in GitLab CI/CD with environment scope is one of the best practices you can adopt to simplify your deployment pipeline. It significantly reduces the risk of manual errors, makes configurations more transparent, and allows your team to focus on feature development rather than wrestling with environment settings. I personally experienced immense relief after implementing this across various projects. It feels like having a personal assistant who always knows which configuration is right for each deployment stage.
With the right combination of environment setup in the GitLab UI, variable definitions with appropriate scopes, and smart .gitlab-ci.yml configuration, you’ll have a robust, automated, and resilient deployment system. So, no more worries about prod connecting to dev! Happy building, and may your pipelines always stay green!