Rancher Setup Guide: Docker Install & K8s Import in 2025
Install Rancher with Docker, configure custom ports, and import existing Kubernetes clusters. Complete step-by-step guide for production-ready setup.
Introduction: From Kubernetes Complexity to Rancher Simplicity
Managing Kubernetes clusters manually can feel like navigating a maze blindfolded. After successfully completing a zero-downtime Kubernetes migration from Docker Swarm where I learned to run multiple container orchestration platforms in parallel, I discovered that having powerful clusters is only half the battle. The real challenge lies in efficient management, monitoring, and scaling across multiple environments.
That breakthrough moment came when I realized that while Kubernetes provides incredible orchestration capabilities, its complexity often becomes a barrier to productivity. Command-line management, YAML configurations scattered across multiple files, and the constant context switching between clusters were eating away valuable development time. This is where Rancher transformed my entire DevOps workflow.
Rancher serves as a centralized management platform that provides a clean, intuitive interface for Kubernetes operations. Instead of memorizing kubectl commands and managing multiple kubeconfig files, Rancher consolidates everything into a unified dashboard where you can monitor cluster health, deploy applications, manage resources, and handle security policies across multiple Kubernetes environments.
In this comprehensive guide, I’ll walk you through setting up Rancher using Docker, configuring it with custom ports to avoid conflicts, and importing existing Kubernetes clusters. This approach builds upon the parallel installation strategy I used during my Docker Swarm migration, ensuring you can adopt Rancher without disrupting your current operations.
Prerequisites: Docker Installation Assumption
For this guide, I’m assuming you already have Docker installed and running on your system. If you followed my previous article on Kubernetes ultra-safe installation, you already have both Docker and containerd running in parallel, which provides the perfect foundation for this Rancher setup.
Understanding Rancher Architecture
Before diving into the installation, it’s crucial to understand what Rancher brings to the table. Rancher operates as a management layer that sits above your Kubernetes clusters, providing:
Core Components
- Rancher Server: The central management component that provides the web UI and API
- Rancher Agents: Lightweight components deployed on managed clusters for communication
- Local K3s Cluster: Rancher runs its own embedded Kubernetes cluster for storing management data
- Authentication Integration: Support for LDAP, Active Directory, SAML, and other identity providers
Management Capabilities
- Multi-Cluster Management: Centralized control of multiple Kubernetes clusters across different environments
- Application Catalog: Pre-configured Helm charts for common applications and services
- Project and User Management: Role-based access control with fine-grained permissions
- Monitoring Integration: Built-in Prometheus and Grafana for cluster monitoring
- Backup and Disaster Recovery: Automated backup solutions for cluster state and data
Launching Rancher with Custom Ports: Production-Ready Setup
The beauty of running Rancher via Docker is its simplicity and isolation. Unlike complex multi-node installations, this approach provides a complete management platform in a single container, perfect for managing multiple remote clusters.
Port Configuration Strategy
Standard ports 80 and 443 are often occupied in production environments. In my setup, these ports were already serving other applications, necessitating a custom port configuration. Here’s the production-ready command I use:
# Create a dedicated directory for Rancher data persistence
sudo mkdir -p /opt/rancher/data

# Run Rancher with custom ports and data persistence
docker run -d --restart=unless-stopped \
  --name rancher-server \
  -p 8020:80 -p 8021:443 \
  -v /opt/rancher/data:/var/lib/rancher \
  --privileged \
  rancher/rancher:stable
Understanding the Configuration
Let’s break down each component of this command:
--name rancher-server: Assigns a memorable name for easier container management-p 8020:80 -p 8021:443: Maps custom external ports to Rancher’s internal HTTP/HTTPS ports-v /opt/rancher/data:/var/lib/rancher: Persists Rancher data outside the container for backup and upgrades--privileged: Required for Rancher’s embedded K3s cluster to function properlyrancher/rancher:stable: Uses the stable tag instead of latest for production reliability
Initial Setup and Security
After starting the container, monitor the initialization process:
# Check container status
docker ps | grep rancher-server

# Monitor initialization logs
docker logs -f rancher-server

# Wait for the "Bootstrap Password" message
docker logs rancher-server 2>&1 | grep "Bootstrap Password"
The bootstrap password will appear in the logs, typically looking like:
[INFO] Bootstrap Password: k8s-admin-password-hereAlso Read: Mastering Automated Docker Tagging in GitLab CI/CD: A Practical Guide
Accessing Rancher Web Interface
Navigate to https://your-server-ip:8021 in your browser. You’ll encounter a self-signed certificate warning, this is normal for initial setup. Accept the warning and proceed to the Rancher interface.
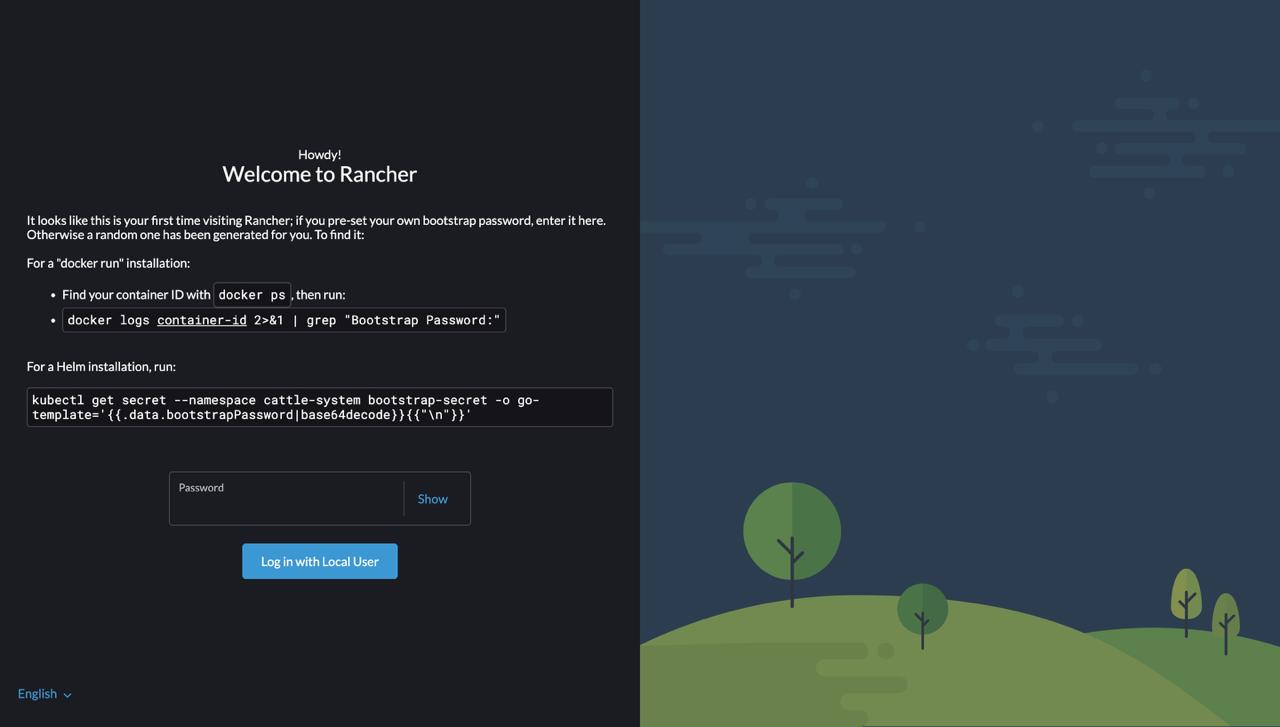 Image #1: Rancher welcome screen displaying the initial setup interface with bootstrap password instructions for Docker and Helm installations.
First-Time Configuration
- Bootstrap Password: Enter the bootstrap password from the container logs
- Set Admin Password: Create a secure password for the admin user
- Server URL: Configure the URL that Rancher will use for cluster communication
- For local development:
https://localhost:8021 - For production:
https://your-domain:8021or use a proper domain with SSL
- For local development:
SSL Certificate Configuration
For production environments, replace the self-signed certificate with a proper SSL certificate:
# Stop the existing container
docker stop rancher-server
docker rm rancher-server

# Run with custom SSL certificates
docker run -d --restart=unless-stopped \
  --name rancher-server \
  -p 8020:80 -p 8021:443 \
  -v /opt/rancher/data:/var/lib/rancher \
  -v /path/to/your/cert.pem:/etc/rancher/ssl/cert.pem \
  -v /path/to/your/key.pem:/etc/rancher/ssl/key.pem \
  --privileged \
  rancher/rancher:stable \
  --no-cacerts
Importing an Existing Kubernetes Cluster: Comprehensive Guide
One of Rancher’s most powerful features is its ability to import and manage existing Kubernetes clusters. This functionality was crucial in my workflow, especially after establishing the parallel Kubernetes installation described in my previous article.
Pre-Import Verification
Before importing a cluster, ensure the target Kubernetes cluster meets these requirements:
# Verify cluster connectivity
kubectl cluster-info

# Check cluster nodes status
kubectl get nodes

# Verify cluster version compatibility (Rancher supports K8s 1.23+)
kubectl version

# Ensure sufficient permissions (cluster-admin recommended)
kubectl auth can-i '*' '*' --all-namespaces
Step-by-Step Import Process
Access Rancher Dashboard: Navigate to your Rancher interface at
https://your-ip:8021Create New Cluster: Click “Add Cluster” and select “Import an existing cluster”
Cluster Configuration:
- Cluster Name: Choose a descriptive name (e.g.,
production-k8s,staging-cluster) - Description: Add relevant details about the cluster purpose
- Labels: Tag clusters for easier organization and filtering
- Cluster Name: Choose a descriptive name (e.g.,
Generate Import Command: Rancher will provide a kubectl command similar to:
curl --insecure -sfL https://your-rancher-ip:8021/v3/import/xyz123.yaml | kubectl apply -f -Execute on Target Cluster: Run the provided command on the target cluster with admin privileges
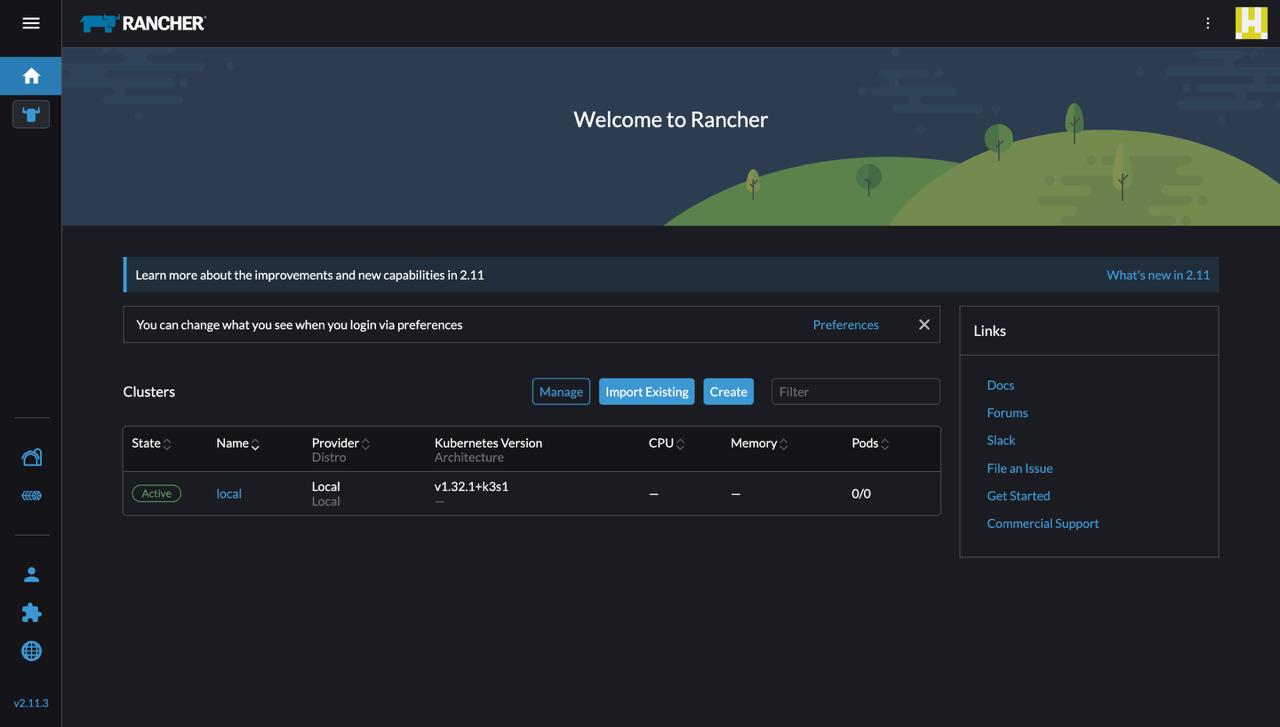 Image #2: Rancher main dashboard displaying the cluster management interface with the local cluster active and options to manage, import, or create new clusters.
Import Command Execution
On your target Kubernetes cluster, execute the import command:
# Download and apply the Rancher agent
curl --insecure -sfL https://your-rancher-ip:8021/v3/import/xyz123.yaml | kubectl apply -f -

# Verify the cattle-system namespace creation
kubectl get namespace cattle-system

# Monitor agent deployment
kubectl get pods -n cattle-system

# Check agent logs if needed
kubectl logs -n cattle-system -l app=cattle-cluster-agent
Troubleshooting Import Issues
Network Connectivity Problems:
# Test connectivity from target cluster to Rancher
curl -k https://your-rancher-ip:8021/ping

# Check firewall rules
sudo ufw status
sudo iptables -L

# Verify DNS resolution
nslookup your-rancher-domain
Permission Issues:
# Verify current user permissions
kubectl auth whoami

# Check cluster-admin binding
kubectl get clusterrolebinding | grep cluster-admin

# Create admin binding if needed
kubectl create clusterrolebinding cluster-admin-binding \
  --clusterrole=cluster-admin \
  --user=$(kubectl config view --minify -o jsonpath='{.contexts[0].context.user}')
Advanced Rancher Configuration
Project and Namespace Management
Rancher introduces the concept of “Projects” which group namespaces and provide additional management capabilities:
# Example project structure
apiVersion: management.cattle.io/v3
kind: Project
metadata:
    name: frontend-apps
    namespace: cluster-id
spec:
    clusterName: production-cluster
    displayName: "Frontend Applications"
    description: "All frontend-related applications and services"
    resourceQuota:
        limit:
            requests.cpu: "10"
            requests.memory: "20Gi"
            limits.cpu: "20"
            limits.memory: "40Gi"
User and Role-Based Access Control
Configure RBAC to manage team access:
- Global Permissions: Manage access to Rancher itself
- Cluster Permissions: Control access to specific clusters
- Project Permissions: Fine-grained access to namespaces within projects
# Create a custom role for developers
kubectl apply -f - <<EOF
apiVersion: rbac.authorization.k8s.io/v1
kind: ClusterRole
metadata:
  name: developer-role
rules:
- apiGroups: ["", "apps", "extensions"]
  resources: ["*"]
  verbs: ["get", "list", "watch", "create", "update", "patch"]
- apiGroups: [""]
  resources: ["secrets"]
  verbs: ["get", "list"]
EOF
Also Read: GitLab CI/CD: Dynamic Variables Across Environments
Monitoring and Observability Setup
Enabling Built-in Monitoring
Rancher provides integrated monitoring through Prometheus and Grafana:
- Navigate to Cluster: Select your imported cluster
- Apps & Marketplace: Go to the Apps section
- Install Monitoring: Search for “Rancher Monitoring” and install
This deployment includes:
- Prometheus: Metrics collection and storage
- Grafana: Visualization and dashboards
- AlertManager: Alert routing and management
- Node Exporter: Node-level metrics collection
Custom Monitoring Configuration
# Custom ServiceMonitor for application metrics
apiVersion: monitoring.coreos.com/v1
kind: ServiceMonitor
metadata:
    name: app-metrics
    namespace: monitoring-system
spec:
    selector:
        matchLabels:
            app: my-application
    endpoints:
        - port: metrics
          interval: 30s
          path: /metrics
Application Deployment Through Rancher
Using the App Catalog
Rancher’s App Catalog simplifies deployment of common applications:
- Access Apps & Marketplace: Navigate to the Apps section in your cluster
- Browse Catalog: Explore available Helm charts
- Configure Application: Set values and deploy
Custom Application Deployment
Deploy applications using Rancher’s workload management:
# Example deployment through Rancher
apiVersion: apps/v1
kind: Deployment
metadata:
    name: web-application
    namespace: production
    labels:
        app: web-app
spec:
    replicas: 3
    selector:
        matchLabels:
            app: web-app
    template:
        metadata:
            labels:
                app: web-app
        spec:
            containers:
                - name: web-app
                  image: nginx:1.21
                  ports:
                      - containerPort: 80
                  resources:
                      requests:
                          memory: "128Mi"
                          cpu: "100m"
                      limits:
                          memory: "256Mi"
                          cpu: "200m"
---
apiVersion: v1
kind: Service
metadata:
    name: web-app-service
    namespace: production
spec:
    selector:
        app: web-app
    ports:
        - port: 80
          targetPort: 80
    type: ClusterIP
Security Best Practices
Network Policies
Implement network segmentation using Kubernetes Network Policies:
apiVersion: networking.k8s.io/v1
kind: NetworkPolicy
metadata:
    name: frontend-netpol
    namespace: production
spec:
    podSelector:
        matchLabels:
            tier: frontend
    policyTypes:
        - Ingress
        - Egress
    ingress:
        - from:
              - namespaceSelector:
                    matchLabels:
                        name: ingress-system
          ports:
              - protocol: TCP
                port: 80
    egress:
        - to:
              - namespaceSelector:
                    matchLabels:
                        name: production
              - podSelector:
                    matchLabels:
                        tier: backend
          ports:
              - protocol: TCP
                port: 8080
Pod Security Standards
Configure Pod Security Standards for enhanced security:
apiVersion: v1
kind: Namespace
metadata:
    name: secure-namespace
    labels:
        pod-security.kubernetes.io/enforce: restricted
        pod-security.kubernetes.io/audit: restricted
        pod-security.kubernetes.io/warn: restricted
Backup and Disaster Recovery
Automated Backup Configuration
Set up automated backups for your Rancher server:
# Create backup script
cat << EOF > /opt/rancher/backup.sh
#!/bin/bash
DATE=$(date +%Y%m%d_%H%M%S)
BACKUP_DIR="/opt/rancher/backups"
mkdir -p $BACKUP_DIR

# Stop Rancher container
docker stop rancher-server

# Create tar backup of data
tar -czf $BACKUP_DIR/rancher_backup_$DATE.tar.gz -C /opt/rancher data

# Restart Rancher container
docker start rancher-server

# Clean old backups (keep last 7 days)
find $BACKUP_DIR -name "rancher_backup_*.tar.gz" -mtime +7 -delete

echo "Backup completed: rancher_backup_$DATE.tar.gz"
EOF

chmod +x /opt/rancher/backup.sh

# Schedule daily backups via cron
echo "0 2 * * * /opt/rancher/backup.sh" | crontab -
Cluster State Backup
For imported clusters, ensure you have backup strategies for:
- etcd snapshots: Core cluster state
- Application data: Persistent volumes and databases
- Configuration: ConfigMaps, Secrets, and custom resources
# Create etcd snapshot (for clusters with direct etcd access)
sudo /opt/rke/bin/etcd snapshot save \
  --endpoints=https://127.0.0.1:2379 \
  --cert=/opt/rke/bin/kube_etcd_127.0.0.1.pem \
  --key=/opt/rke/bin/kube_etcd_127.0.0.1-key.pem \
  --cacert=/opt/rke/bin/kube_ca.pem \
  /opt/etcd-backups/snapshot-$(date +%Y%m%d_%H%M%S).db
Performance Optimization and Scaling
Resource Allocation
Monitor and optimize Rancher server resources:
# Monitor Rancher container resource usage
docker stats rancher-server

# Check memory and CPU utilization
docker exec rancher-server cat /proc/meminfo
docker exec rancher-server cat /proc/loadavg
Database Optimization
For production environments, consider external database:
# Run Rancher with external MySQL/PostgreSQL
docker run -d --restart=unless-stopped \
  --name rancher-server \
  -p 8020:80 -p 8021:443 \
  -v /opt/rancher/data:/var/lib/rancher \
  --privileged \
  rancher/rancher:stable \
  --db-host=mysql.example.com \
  --db-port=3306 \
  --db-user=rancher \
  --db-pass=password \
  --db-name=rancher
Troubleshooting Common Issues
Container Startup Problems
# Check container logs for errors
docker logs rancher-server

# Verify port availability
sudo netstat -tulpn | grep :8021

# Check disk space
df -h /opt/rancher

# Verify privileged mode
docker inspect rancher-server | grep Privileged
Cluster Import Failures
# Verify kubectl connectivity
kubectl cluster-info

# Check Rancher agent status
kubectl get pods -n cattle-system

# Review agent logs
kubectl logs -n cattle-system -l app=cattle-cluster-agent --tail=100

# Test network connectivity
curl -k https://your-rancher-ip:8021/ping
Performance Issues
# Monitor system resources
top
free -h
iostat -x 1

# Check Docker daemon status
sudo systemctl status docker

# Review container resource limits
docker exec rancher-server cat /sys/fs/cgroup/memory/memory.limit_in_bytes
Conclusion: Transforming Kubernetes Management
Implementing Rancher as a centralized management platform has fundamentally transformed how I approach Kubernetes operations. The combination of intuitive UI, robust multi-cluster management, and seamless integration with existing infrastructure creates a powerful foundation for scaling containerized applications.
The journey from manual kubectl commands to a unified management dashboard represents more than just operational efficiency, it’s about democratizing Kubernetes access for team members who might otherwise struggle with command-line complexity. This approach aligns perfectly with the parallel installation strategy I employed during my Docker Swarm migration, ensuring that adopting new tools enhances rather than disrupts existing workflows.
Whether you’re managing a single development cluster or orchestrating dozens of production environments across multiple cloud providers, Rancher provides the centralized control and visibility needed for effective container orchestration at scale. The investment in proper setup, security configuration, and monitoring pays dividends in reduced operational overhead and improved system reliability.